Bulk update group memberships for Atlassian Cloud using Postman and REST APIs
Platform Notice: Cloud - This article applies to Atlassian products on the cloud platform.
Summary
When to use this article
This article may be used whenever there is a need to bulk update and add group memberships in Atlassian Cloud. Note that this article outlines how to update memberships, but does not update the usage of groups in Jira projects, Jira permission schemes, Confluence space permissions, or Confluence page restrictions.
When not to use this article
This article will not work for organizations with users and groups provisioned with Atlassian Guard SCIM. To change group memberships provisioned through SCIM, please take a look at your identity provider administrator.
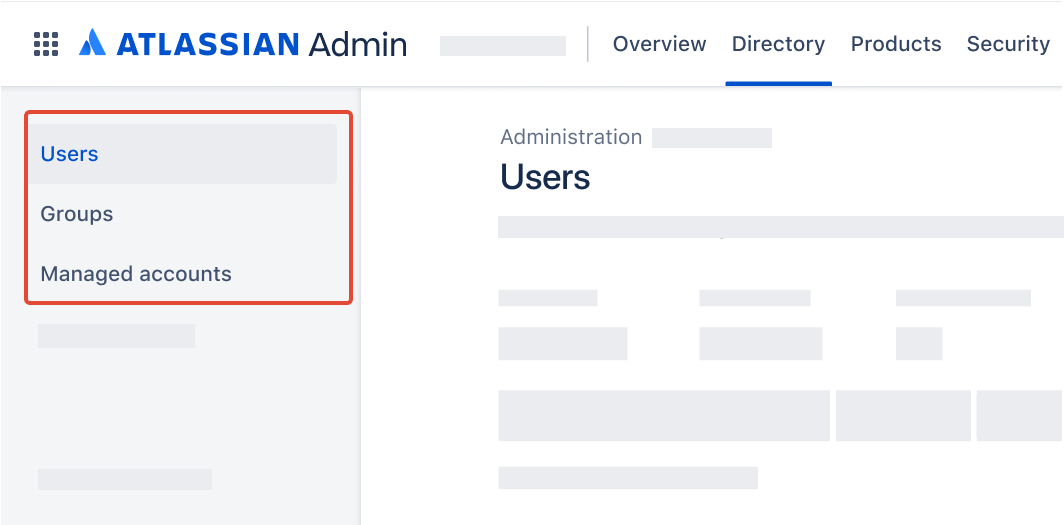
Identify your organisation’s user management
Head to admin.atlassian.com. Select your organization if you have more than one.
Original | Centralized |
As a site administrator or organization admin, Users are found under the Product site.
| As an organization admin, Users are found under the Directory tab.
|

Prepare data
Original data
Sample file
| A | B | |
|---|---|---|
| 1 | Group | |
| 2 | vdillow@banc.ly | oslo-engineering |
| 3 | ftoten2@banc.ly | hanoi-legal |
| 4 | amelmeth@banc.ly | houston-sales |
Get user identifiers
- Go to admin.atlassian.com. Select your organization if you have more than one.
This step is different depending on your user management experience:
- Original: Select the site's name and URL to open the Admin for that site, then select Users.
- Centralized: Select Directory > Users.This step is different depending on your user management experience:
- Original: Select Export users.
- Centralized: At the top of the screen, select > Export users.Select the users that you’d like to export:
All users in your site/organization – Include all users in your site/organization, across all groups.
Users from selected groups only – Only includes users in your selected groups.
Select "All users" to include active, suspended, and deactivated users.
- Select Export users.
- An email will be sent when the CSV file is ready to download. Check your junk or spam folder if it’s taking a while.
- Open the email and select Download CSV file.
- Rename the file to
users.csv. - Using a spreadsheet program, remove columns D onwards. This leaves a CSV file with only three columns.
- Save the CSV.
Sample file - users.csv
| A | B | C | |
|---|---|---|---|
| 1 | User id | Username | email |
| 2 | 6155833c071axxx071ff5b24 | Janaye Float | jfloat@banc.ly |
| 3 | 7a4b625f3fd5xxx24d741ac7 | Anissa Melmeth | amelmeth@banc.ly |
| 4 | e2345d51eaa4xxx984e377ce | Verna Dillow | vdillow@banc.ly |
| 5 | 3c5e0172a629xxx061259ed9 | Dorice Snapper | dsnapper@banc.ly |
| 6 | 982bfd68520fxxx71daccb32 | Florian Toten | ftoten2@banc.ly |
Get group identifiers
- This step is different depending on your user management experience:
- Original: Select Export users.
- Centralized: At the top of the screen, select > Export users. Select further options to include additional data in the download, which may assist with filtering the data:
Group membership – Includes groups a user belongs to. By default, multiple groups are formatted as a comma-separated list.
Pivot to column – Expands group data from a comma-separated list to a column list called Group name. Additionally, it includes a new column for Group id.
Select Export users.
An email will be sent when the CSV file is ready to download. Check your junk or spam folder if it’s taking awhile.
Open the email and select Download CSV file.
- Rename the file to
groups.csv. Using a spreadsheet program, remove columns C onwards. This leaves a csv file with only two columns.
- Remove all duplicate rows.
- Excel - Highlight all values, click Data > Data Tools > Remove Duplicates.
- Google Sheets - Highlight all values, click Data > Data cleanup > Remove duplicates.
Save the csv.
Sample file - groups.csv
| A | B | |
|---|---|---|
| 1 | Group id | Group name |
| 2 | d6750b14-1aa8-4ab2-xxxx-a6d44016da32 | oslo-engineering |
| 3 | 396fae73-650c-4265-xxxx-9c840897fc68 | houston-sales |
| 4 | 0b200647-b447-4eaf-xxxx-55ec31a7d4c9 | hanoi-legal |
| 5 | 2e6317f2-8c9f-4abb-xxxx-afd8fb7c3ebe | lille-product-management |
| 6 | 705e51a5-b12b-4587-xxxx-f42bc099b777 | porto-alegre-support |
Map data
- Open the original list of groups and users in a spreadsheet program.
- Into a new tab, import the previously created
users.csv. This assumes the tab is now called "users". - Into a new tab, import the previously created
groups.csv. This assumes the tab is now called "groups". - Open the spreadsheet tab containing the original list.
Ensure columns A and B have the desired user email address and group name respectively.
- In cell C1, label the column header
accountId, noting the case is important. In cell C2, type:
=XLOOKUP($A2,users!$C$2:$C$1000,users!$A$2:$A$1000,"") Ensure that A2:C1000 in the sheet
 userscovers all users. This assumes column A contains the "Account id" and column C contains "email address" inusers. The value of "1000" may need to be increased.- Fill the remaining cells with an equivalent formula, ensuring $A2 is updated to the corresponding cell in the same row, but the remaining arguments remain the same.
- Perform a random check to ensure the lookup is behaving as expected.
- In cell D1, label the column header
groupId, noting the case is important. In cell D2, type:
=XLOOKUP($B2,groups!$B$2:$B$1000,groups!$A$2:$A$1000,"") Ensure that A2:C1000 in the sheet groupscovers all groups. This assumes column A contains the "Group id" and column B contains "Group name" ingroups. The value of "1000" may need to be increased.- Fill the remaining cells with an equivalent formula, ensuring $A2 is updated to the corresponding cell in the same row, but the remaining arguments remain the same.
- Perform a random check to ensure the lookup is behaving as expected.
- The resulting list should now be supplemented with account id's and group id's, and contain four columns.
- Save the resulting list as a csv.
Sample file
| A | B | C | D | |
|---|---|---|---|---|
| 1 | Group | accountId | groupId | |
| 2 | vdillow@banc.ly | oslo-engineering | e2345d51eaa4xxx984e377ce | d6750b14-1aa8-4ab2-xxxx-a6d44016da32 |
| 3 | ftoten2@banc.ly | hanoi-legal | 982bfd68520fxxx71daccb32 | 0b200647-b447-4eaf-xxxx-55ec31a7d4c9 |
| 4 | amelmeth@banc.ly | houston-sales | 7a4b625f3fd5xxx24d741ac7 | 396fae73-650c-4265-xxxx-9c840897fc68 |
Set up Postman
This section may be skipped if:
a collection named "Atlassian Cloud User Management" has previously been set up, and
an environment named "Atlassian Cloud" has previously been set up
See page Set up Postman for bulk user management for detailed steps to set up Postman.
Set up REST API call
Select New, or type
Ctrl+N(Windows/Linux) orCmd+N(MacOS).Select HTTP.
Name the request "Add User to Group in Atlassian Cloud".
Change the method from
GETtoPOST.In the URL, paste:
{{cloudUrl}}/rest/api/2/group/user?groupId={{groupId}} Note that Postman variables are case-sensitive and must match what is supplied in the attached environment and spreadsheet.Select the Authorization tab.
Ensure Type is "Inherit auth from parent".
- Select the Body tab.
- Select content type raw.
In the content space for Body, paste:
{
    "accountId": "{{accountId}}"
}
Note that Postman variables are case-sensitive and must match what is supplied in the attached spreadsheet.Click Save, saving into the "Atlassian Cloud User Management" collection.
Execute Postman Runner
Change the environment using the environment selector at the top right of Postman, selecting "Atlassian Cloud".
Select Collections in the sidebar.
Select the "Atlassian Cloud User Management" collection.
On the Overview tab, select ▶️ Run towards the top right corner.
Under Run order, ensure there is one and only REST API call - "Add User to Group in Atlassian Cloud".
On the Functional tab, select Run manually.
Click Data.
Navigate to and select the previously prepared csv file from "Map data".
Reduce the number of "Iterations" under Run configuration to 1.
Leave Advanced settings as is.
Select Run Atlassian Cloud User Management.
Check Postman to ensure the runner collection has passed all tests. The run results should show:
"Iterations" and "All tests" to be equivalent in count
Passed (n) where n is the number of iterations
Failed (0)
Skipped (0)
Check admin.atlassian.com to ensure the user in row 2 of the exported list has been made a member of the expected group.
Rerun Postman Runner following the previous steps, with the number of "Iterations" set to the number of rows in the csv file.
Troubleshooting
| Error | Comments |
|---|---|
| 401 | Check your credentials. |
| 404 |
|
References
- Export users from a site
- Microsoft - Import or export text (.txt or .csv) files
- Jira Cloud REST API - Add user to group
- Postman - Using the Collection Runner