Configuring Workflow
A JIRA workflow is the set of steps and transitions that an issue goes through during its lifecycle.
Workflows typically represent business processes.
JIRA ships with a built-in workflow called 'JIRA Workflow (jira)'. This workflow is typically referred to as the system workflow and cannot be edited. You can, however, make a copy of the system workflow, which you can then edit to create new workflows. Each workflow can be associated with particular projects and, optionally, specific issue type(s) by using a workflow scheme.
JIRA's system workflow

Configuring a workflow
Editing a workflow
Editing a workflow means that you are modifying the steps and transitions that make up a workflow. Read more about steps and transitions on this page.
There are slight differences between editing an inactive and an active workflow. Restrictions are placed on the modifications you can make to an active workflow, due to the impact the changes will have on projects and/or issue types that the workflow is applied to.
Active versus inactive workflows
An inactive workflow is a workflow that is not currently being used by any projects. Because there are no issues currently transitioning through an inactive workflow, you can simply edit the workflow's steps and transitions.
An active workflow is a workflow that is currently being used by one or more projects.
When you edit an active workflow, JIRA first creates a draft of it. You can then modify the draft as you see fit. Once you have finished modifying your draft workflow, you can publish your draft and, optionally, save your original workflow as an inactive backup.
Limitations when editing an active workflow
Please note that the following limitations apply when editing an active workflow (i.e. a draft workflow):
- It is not possible to edit the workflow name (only the description) if a workflow is active.
- Workflow steps cannot be deleted.
- A step's associated Status cannot be edited.
- If a step has no outgoing transitions (Global transitions are not considered), it cannot have any new outgoing transitions added.
- A step's Step ID cannot be changed.
If you wish to make any of the modifications listed above, then you will need to copy the workflow (see Creating a workflow above), modify the copy and then activate it.
Steps and transitions
JIRA workflows consist of steps and transitions:
- A step represents a workflow's current status for an issue.
- An issue can exist in one step only at any point in time.
- Each workflow step corresponds to a linked status . When an issue is moved into a particular step, its status field is updated to the value of the step's linked status. In the diagram above, the blue boxes represent steps/statuses.
- When defining a step, you can optionally specify properties , one of which allows you to make an issue uneditable while it is in that step.
 Although steps and statuses are treated separately when administering workflows, they are effectively synonymous concepts in JIRA and as such, it usually helps to name a step after its linked status.
- A transition is a link between two steps.
- A transition allows an issue to move from one step to another step.
- For an issue to be able to progress from one particular step to another, a transition must exist that links those two steps.
- A transition is a one-way link, so if an issue needs to move back and forth between two steps, two transitions need to be created. In the diagram above, the arrows represent transitions.
- The available workflow transitions for an issue are listed on the issue's 'view issue' page. A user can execute a transition (i.e. move the issue through workflow) by clicking one of the available links, e.g.:

When defining a transition, you can optionally specify:- A screen to be displayed to the user — this is useful if you need the user to provide input before completing the transition.
- Conditions — these control who can perform a transition (i.e. who can see the transition link on the 'view issue' page).
- Validators — these check that any user-supplied input is valid before performing the transition.
- Post functions — these perform particular actions after the transition is complete, e.g.:
- Assign the issue to a particular user.
- Send an email notification.
- Update a field in the issue.
Open and Closed issues defined
Within JIRA (e.g. in the Assigned To Me gadget and other gadgets), an issue is determined to be Open or Closed based on the value of its Resolution field — not its Status field.
- An issue is determined to be Open if its Resolution field has not been set.
- An issue is determined to be Closed if its Resolution field has a value (e.g. Fixed, Cannot Reproduce).
This is true regardless of the current value of the issue's Status field (Open, In Progress, etc).
Therefore, if you need your workflow to force an issue to be Open or Closed, you will need to set the issue's Resolution field during a transition. There are two ways to do this:
- Set the Resolution field automatically via a post function.
- Prompt the user to choose a Resolution via a screen.
Creating a workflow
- Log in as a user with the JIRA Administrators global permission.
- Choose the cog icon
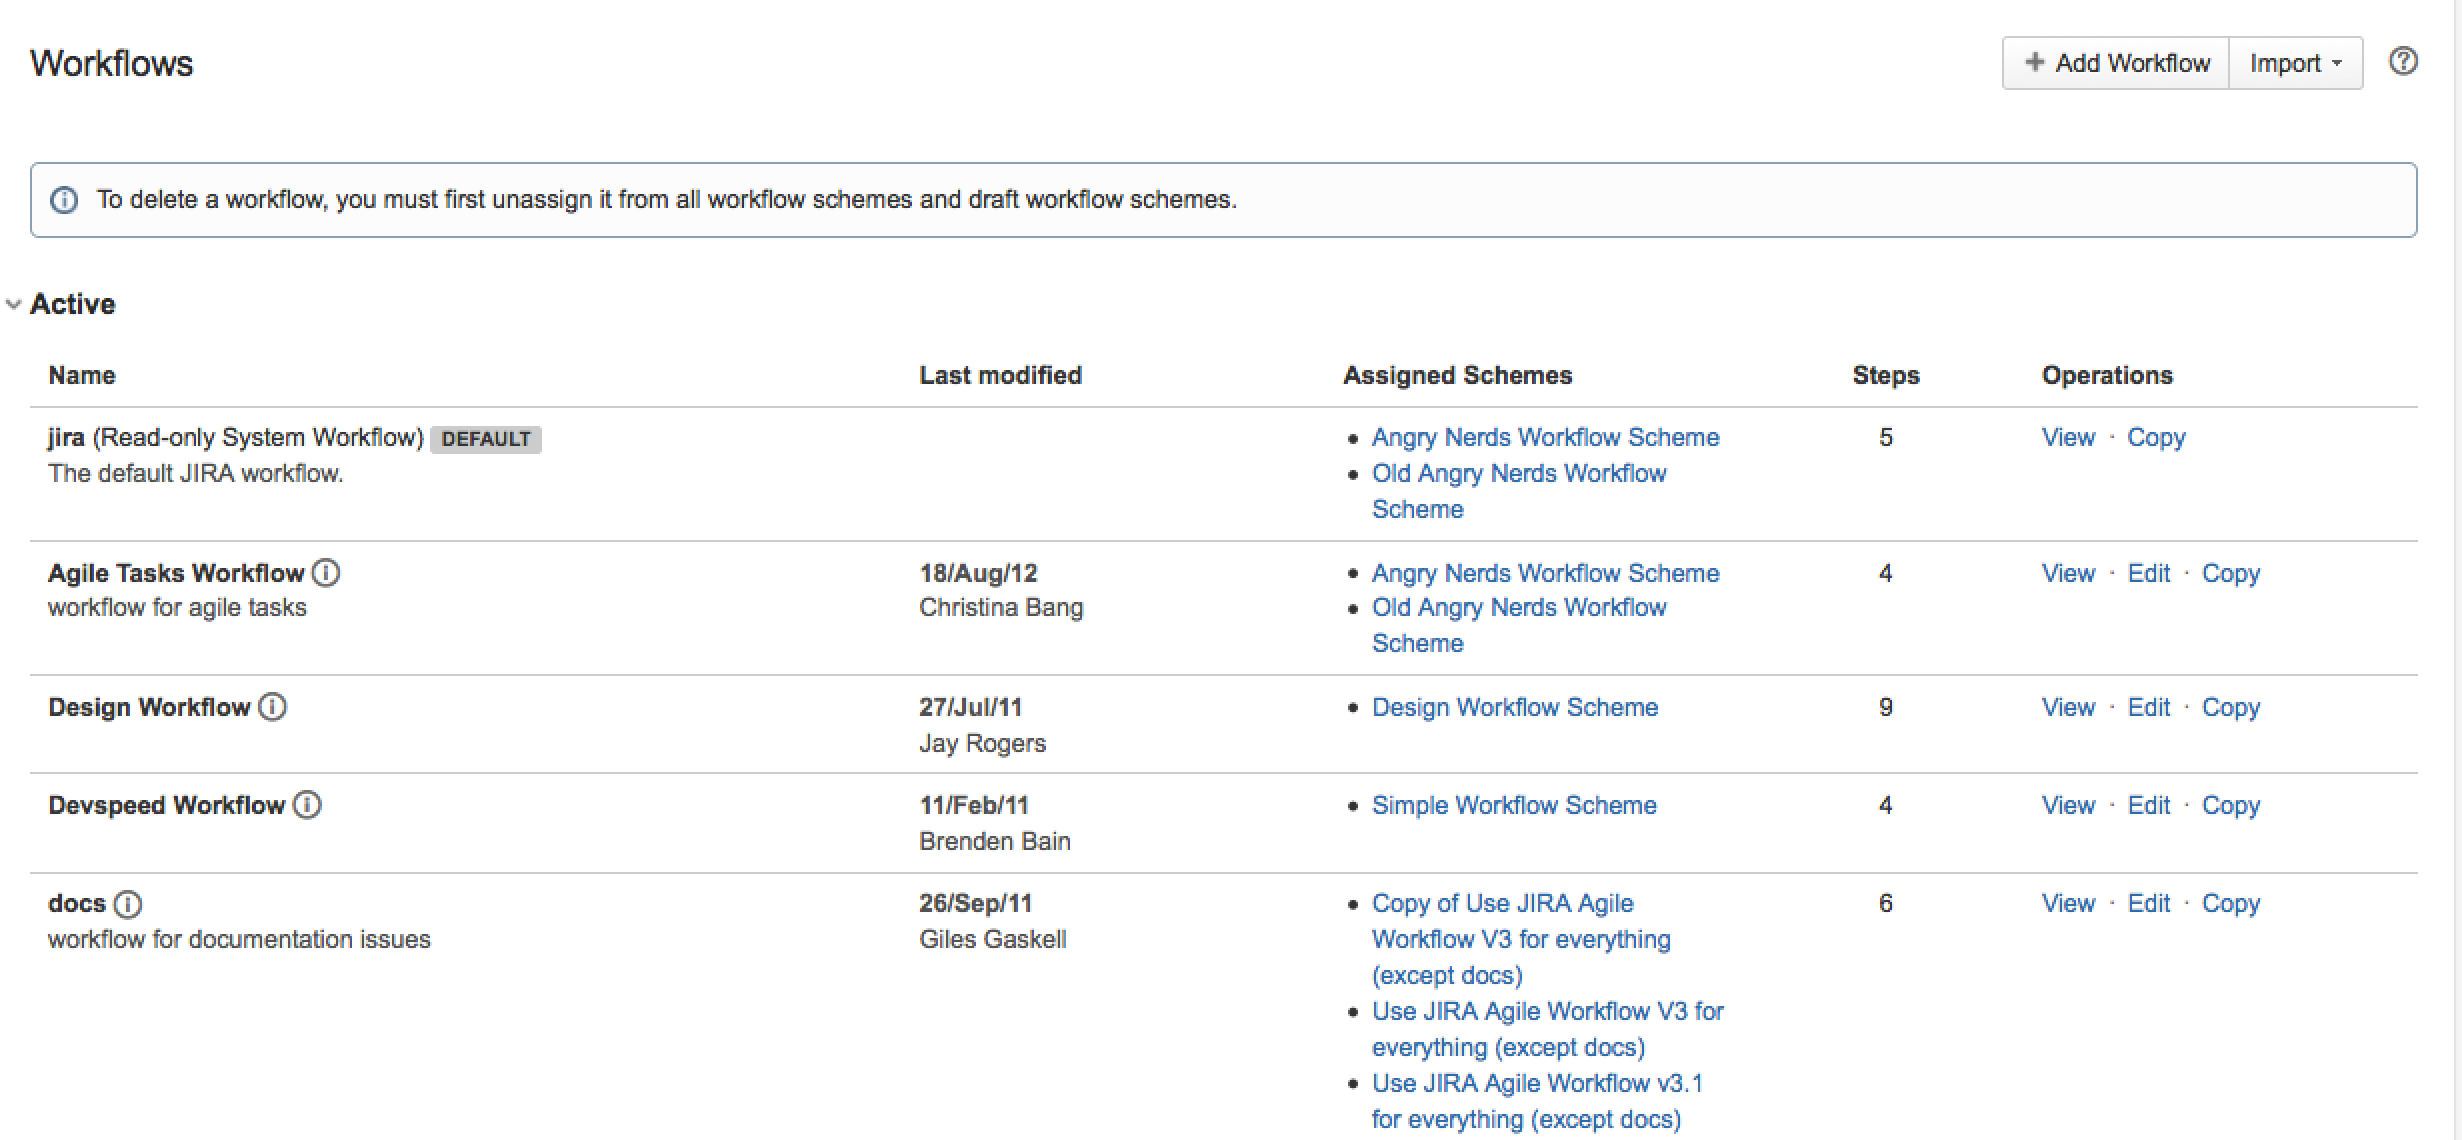
 at top right of the screen, then choose Issues. Select Workflows to open the 'Workflows' page, which shows a list of all existing workflows in your system.
- Option 1 (Recommended Approach): Copy an existing workflow using the Copy link for an existing workflow.
- In the Copy Workflow dialog box, enter a name and description for your workflow.
- Click the Copy button. The workflow will open in edit mode, showing the layout of your copied workflow.
 If you are copying the system workflow and wish to rename the workflow transition buttons on the 'view issue' page, you must delete the
 jira.i18n.titleandjira.i18n.descriptionproperties from all transitions in the copied workflow. Otherwise, the default names (i.e. values of these properties) will persist. Read more about transition properties.
- Option 2 (for Advanced Administrators): Create a new workflow using the Add Workflow button:
- Enter a name and description for your workflow.
- Click the Add button.
The workflow opens in edit mode and contains a step called Open. If you are viewing your workflow in Diagram mode, you see an incoming transition called Create.
- Once you have created your new workflow (especially if you created a 'blank' workflow) you may want to customise it by adding and/or editing steps and transitions.
- When you have finished customising your new workflow, see Activating workflow for details on how to use it with a JIRA project.
Editing a project's workflow for the first time
Whenever a new JIRA project is created, your project automatically uses the default workflow scheme, which associates all available issue types in the project with the 'jira' system workflow.
Since neither the 'jira' system workflow nor the default workflow scheme are editable, JIRA automatically creates an editable copy of the 'jira' system workflow (and accompanying workflow scheme) for your project. This saves you the need to manually create both a new workflow – i.e., a copy the 'jira' system workflow – and a workflow scheme for your new project.
To begin editing your project's workflow for the first time:
- Log in as a user with the JIRA Administrators global permission.
- Choose the cog icon
 at top right of the screen, then choose Projects.
 - Do either of the following:
- On the left of the Project Summary page, click the pencil icon in the Workflows section:

- On the the project's Workflow page (accessed via the Workflow tab on the left), click the pencil icon at the top-right of the box displaying the jira system workflow:


- On the left of the Project Summary page, click the pencil icon in the Workflows section:
- Click Continue to proceed. JIRA automatically does the following:
- Creates a copy of the 'jira' system workflow named Your Project Name Workflow.
- Creates a new workflow scheme for Your Project Name Workflow named Your Project Name Workflow Scheme.
- Associates any existing issues in your project with the new Your Project Name Workflow.
 Please Note:
 - If you have no (or only a small number of) existing issues in your JIRA project, this process is relatively quick.
- If you have many (e.g. thousands of) existing issues in your JIRA project, this process may take some time.
- Once this process begins, it cannot be paused or cancelled. Please avoid editing or transitioning any issues within your project while this process is taking place.
- JIRA creates a draft of the workflow, which you can now edit:

Since this workflow is being used by your project, you will be editing an active workflow and hence, working with a draft of the workflow in edit mode.
Editing any JIRA workflow directly
To directly edit any of JIRA's workflows:
- Log in as a user with the JIRA Administrators global permission.
- Choose the cog icon at top right of the screen, then choose Issues. Select Workflows to open the 'Workflows' page, which shows a list of all existing workflows in your system.
- Click the Edit link (under Operations) associated with the workflow you want to edit, which opens the workflow in edit mode.
There are two types of edit mode, Diagram and Text. JIRA remembers your last edit mode and presents you with that edit mode for your next workflow. Otherwise, JIRA defaults to Diagram edit mode.- Diagram edit mode — known as the Workflow Designer in earlier JIRA versions:

For details on using Diagram edit mode, see Using 'Diagram' edit mode below. - Text edit mode — known as the View Workflow Steps page in earlier JIRA versions:
- To switch between Diagram and Text edit modes, click the buttons near the top-left of the workflow page.
It is not possible to edit the system workflow, you can only create a copy of it. - Diagram edit mode — known as the Workflow Designer in earlier JIRA versions:
- Add and/or edit your workflow's steps and transitions as required.
- If you are editing:
- An inactive workflow, you do not need to proceed any further. However, you may wish to associate your edited workflow with a project, which in turn activates the workflow. (See Activating Workflow for more information.)
- An active workflow:
- Click Publish Draft at the top right of workflow page in edit mode. A confirmation dialog box is displayed:
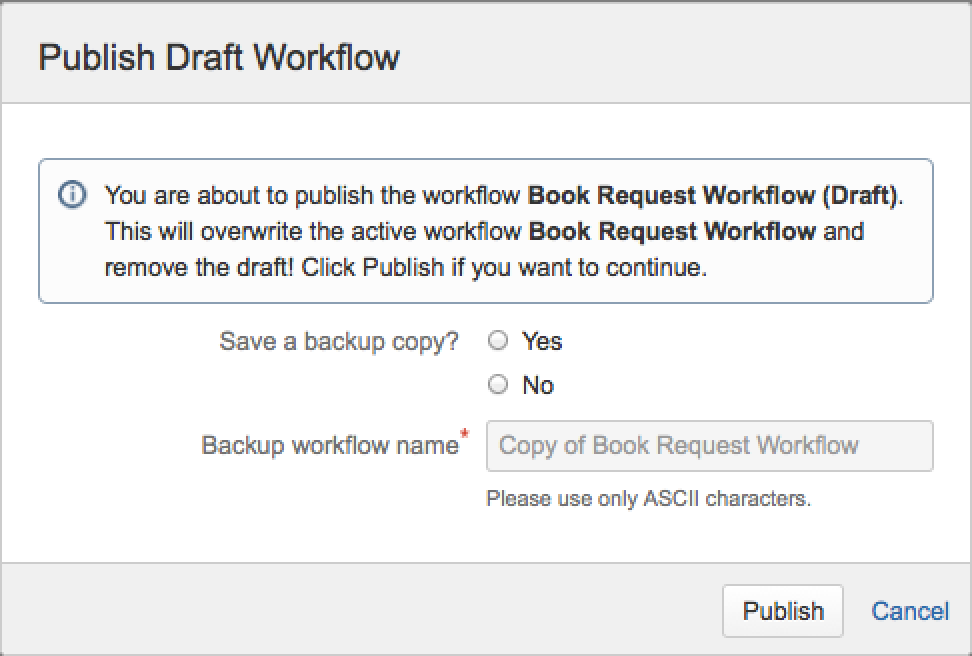
- Select whether or not you wish to save the original workflow as an inactive backup copy. If you choose Yes, enter a name for the inactive copy.
- Click Publish to publish your draft.
- Click Publish Draft at the top right of workflow page in edit mode. A confirmation dialog box is displayed:
![]() Note: After creating a draft of an active workflow, you can edit the draft workflow as described in the sections below. Any changes that you make do not affect the active workflow until the draft is published.
Note: After creating a draft of an active workflow, you can edit the draft workflow as described in the sections below. Any changes that you make do not affect the active workflow until the draft is published.
Using Diagram edit mode
Diagram edit mode allows you to visualise the entire layout of your workflow as well as create and edit a workflow's steps and transitions.
The Diagram edit mode interface is shown in the following diagram.

![]() Note:
Note:
- The Statuses and Global Transitions panels are expandable. If these panels are not visible (i.e. collapsed), expand them by clicking the vertical bar (containing a small arrow mid-way along the bar) on the left-hand edge of the workflow design area.
- Keyboard shortcuts are not available in Diagram edit mode.
Using the main toolbar
The main toolbar lets you visually arrange your workflow's steps/statuses and transitions on the workflow design area.
Button | Description |
|---|---|
| Select Tool |
| Create Transition — Straight Line |
| Create Transition — Polygonal Line |
| Create Transition — Bezier Line |
| Create Annotation |
| Zoom In |
| Zoom Out |
| Save Snapshot Image |
| Toggle Transition Labels |


Using the 'Statuses' panel
The Statuses panel lists all available JIRA statuses that have not already been associated with a step on the workflow design area. It also provides tools for adding new statuses or editing existing ones.
Button | Description |
|---|---|
| Refresh List |
| Add New Status |
| Status Editor |


![]() You can use the Statuses panel to add a step to your workflow.
You can use the Statuses panel to add a step to your workflow.
Using the 'Global Transitions' panel
The Global Transitions panel lists all global transitions used in your workflow. A global transition is one in which the destination step of the transition has all other steps in the workflow as incoming steps, but only requires you to edit or update this transition in one place.
![]() Note:
Note:
- Global Transitions are similar to – but not the same as – 'common transitions'.
- To avoid clutter, global transitions do not appear on the workflow design area. Instead, they display in the Global Transitions panel as well as every step of your workflow in Text edit mode (below).
- Global Transitions can only be edited/deleted in Diagram mode. They cannot be configured in Text mode.
The Global Transitions panel also provides tools for adding new global transitions, as well as editing or deleting existing ones.
Button | Description |
|---|---|
| Add New Transition |
| Edit Selected Transition |
| Delete Selected Transition |
Using the workflow design area
The workflow design area shows the layout of your workflow's steps as well as transitions, consisting of transition lines and labels.
Use the Select Tool (above) to move these items around workflow design area.
![]() Note:
Note:
- A workflow depicted in the workflow design area is what regular JIRA users will see when viewing the workflow from the 'view issue' page (via the View Workflow link).
- Any changes that you make to items in the workflow design area (including their layout) is automatically saved whenever you leave Diagram edit mode for your workflow.
Editing or deleting annotations
Once you have added an annotation using the Create Annotation tool (above), you can do the following:
- To resize an annotation, drag the edges or corners of the 'sticky note'.
- To edit the text inside an annotation, click inside the annotation and begin modifying the text.
- To remove an annotation, click the X at the top-right of the 'sticky note'.
Working with steps
Adding a step
To add a new step to a workflow:
- Log in as a user with the JIRA Administrators global permission.
- Choose the cog icon at top right of the screen, then choose Issues. Select Workflows to open the 'Workflows' page, which shows a list of all existing workflows in your system.
- Click the Edit link next to the workflow that you wish to add a step to.
- Use either Diagram or Text edit mode pages to add the new step to the workflow.
Using Diagram edit mode to add the new step
- Make sure that your workflow is in Diagram edit mode. Your workflow's existing steps as well as the lines and labels of transitions between these steps are shown in the workflow design area.
- Drag an available status from the Statuses panel list and drop it onto the workflow design area. A new step is added to your workflow.

Note: - The name of the status, which is equivalent to the Linked Status indicated in Text edit mode (below) is assigned to the step's Step Name (id). This step name is displayed on the step you dragged from the Statuses panel to the workflow design area.
- Because steps on the workflow design area depict step names, if you use the Statuses panel (in Diagram edit mode above) to change the name of a status that has already been added to the workflow design area, the step name will remain unchanged in this area. To change the name of a step, see Editing a step.
Using 'Text' edit mode to add the new step
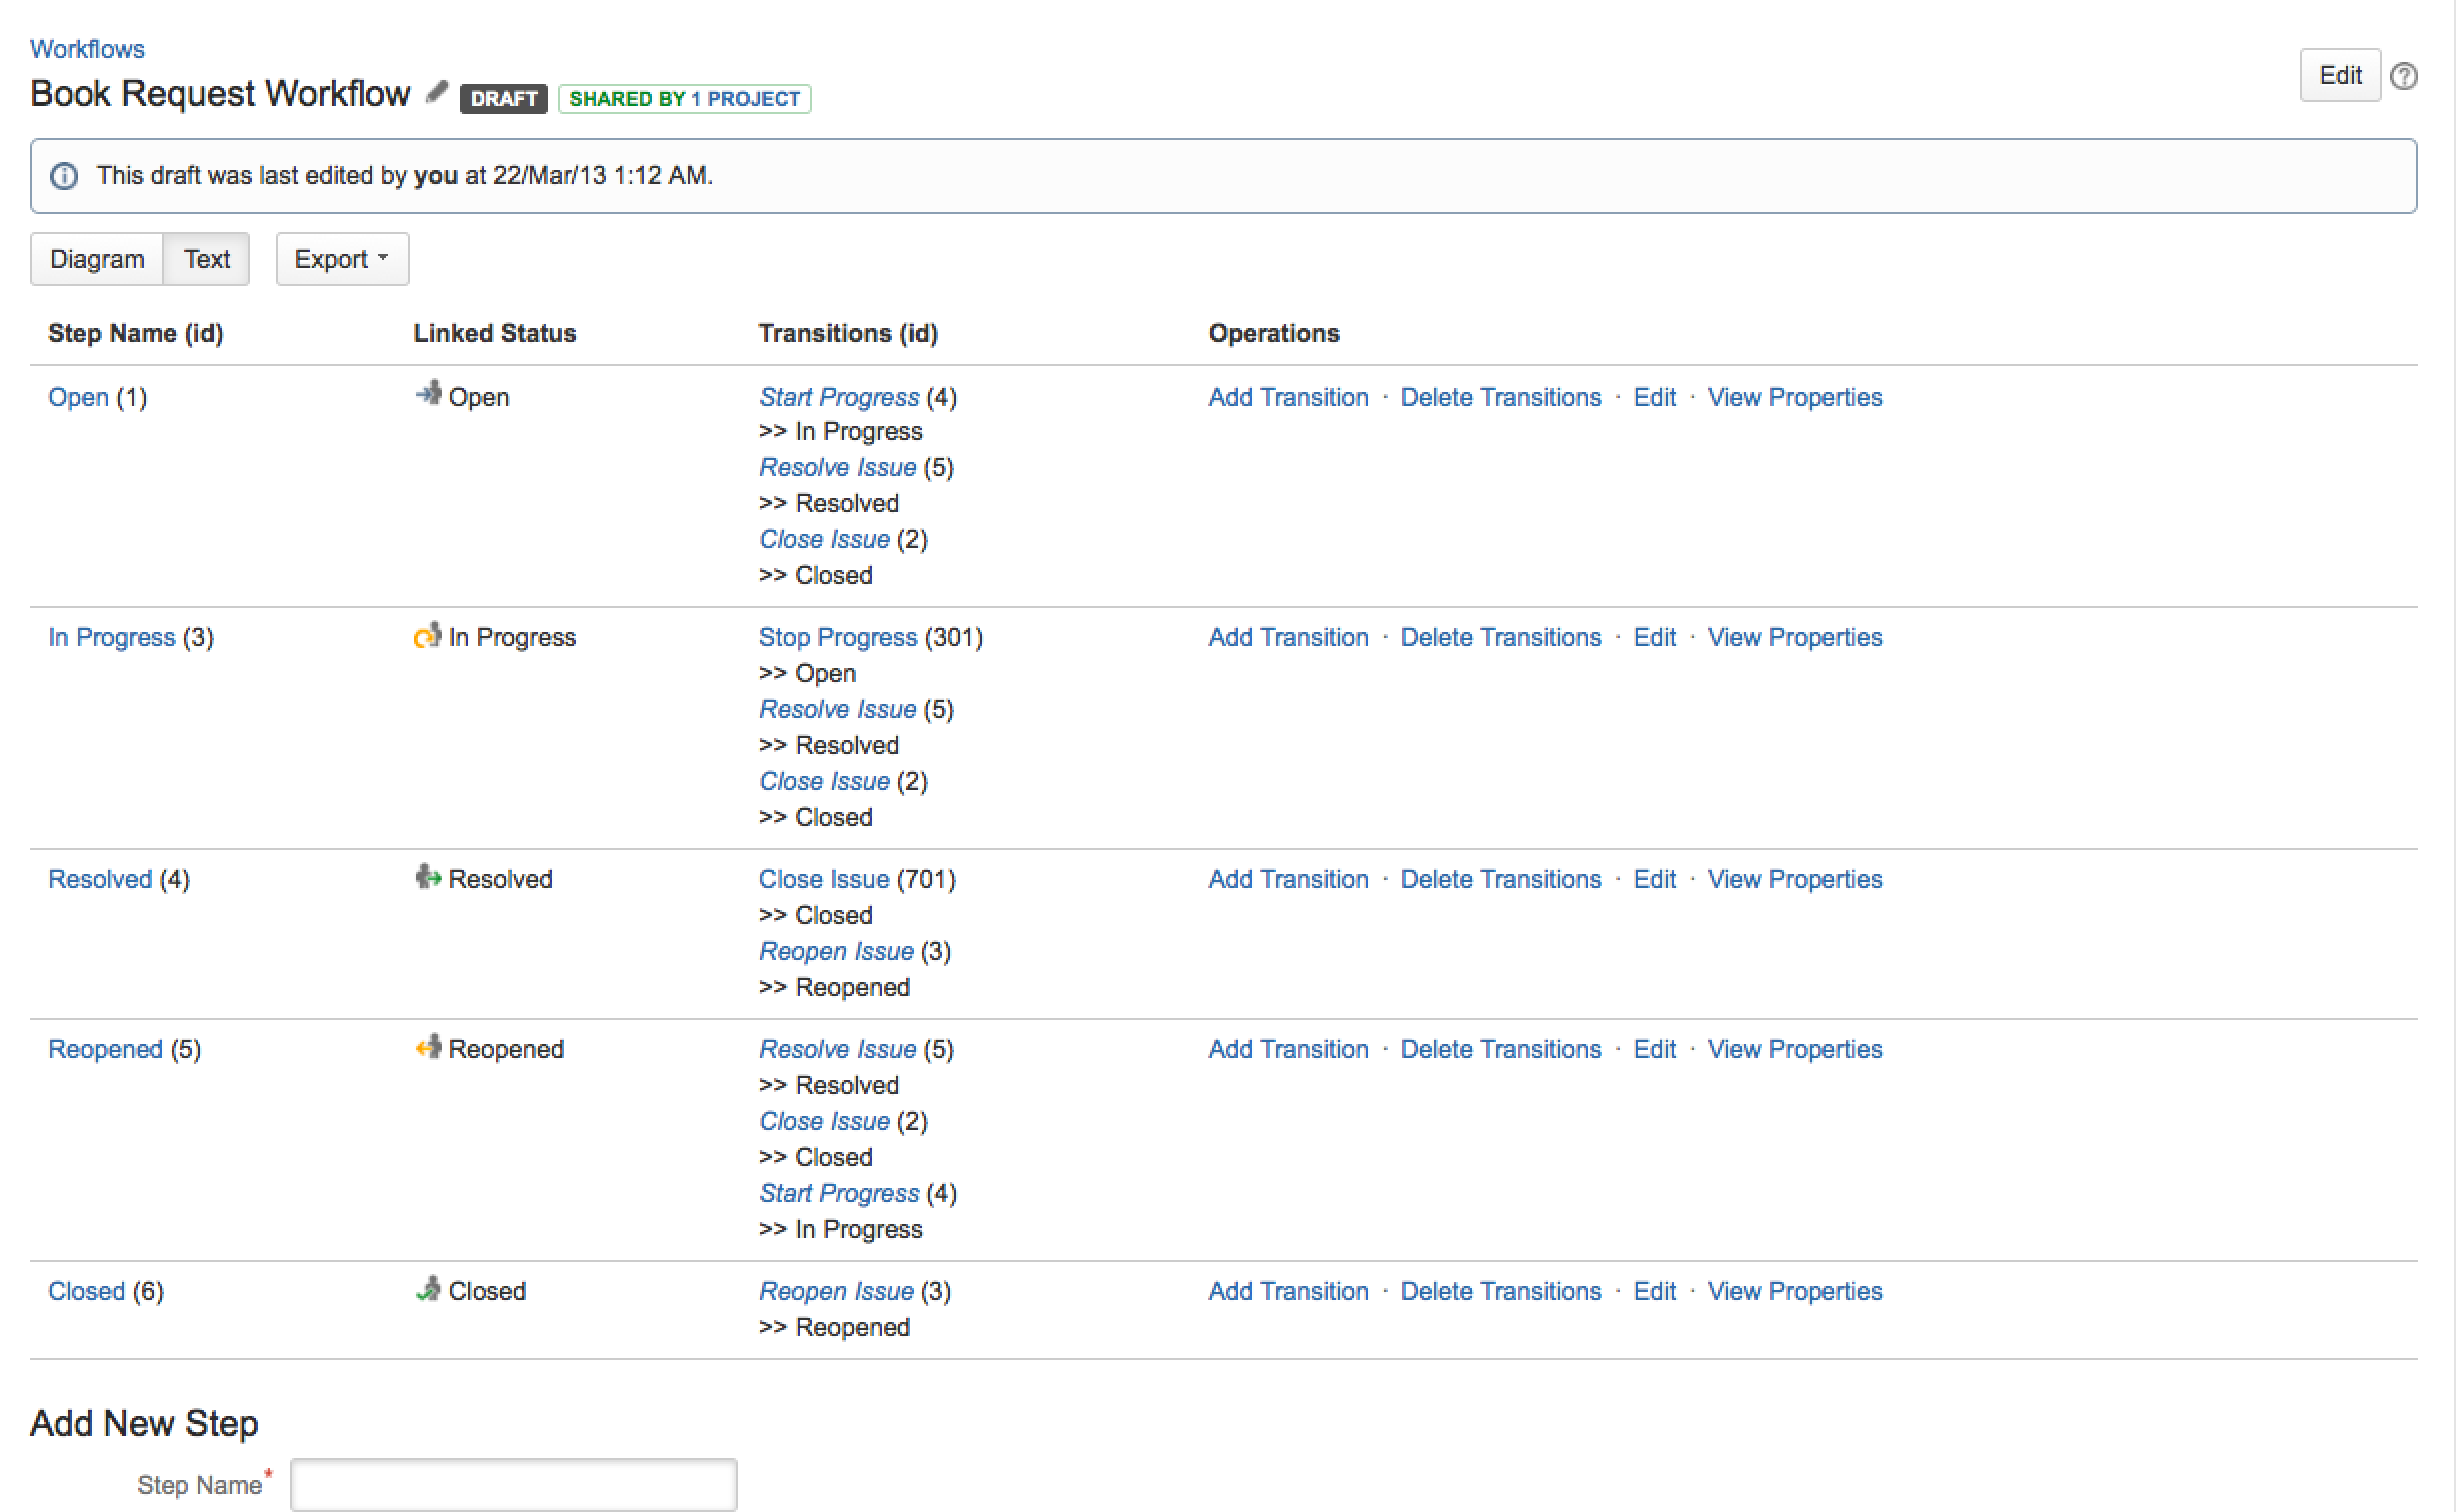
- Make sure that your workflow is in Text edit mode. A list of existing steps making up the workflow and each step's Linked Status and Outgoing Transitions (under Transitions (id)) is shown.
Note: - The Add New Step form appears below the list of steps. However, this will only be shown if the workflow is inactive or you are editing the draft of an active workflow.
- If no fields appear in this form, then all available statuses defined in your JIRA installation have been used in your workflow and you need to define a new status.
- Italicised transitions shown under Transitions (id) are 'common transitions'.
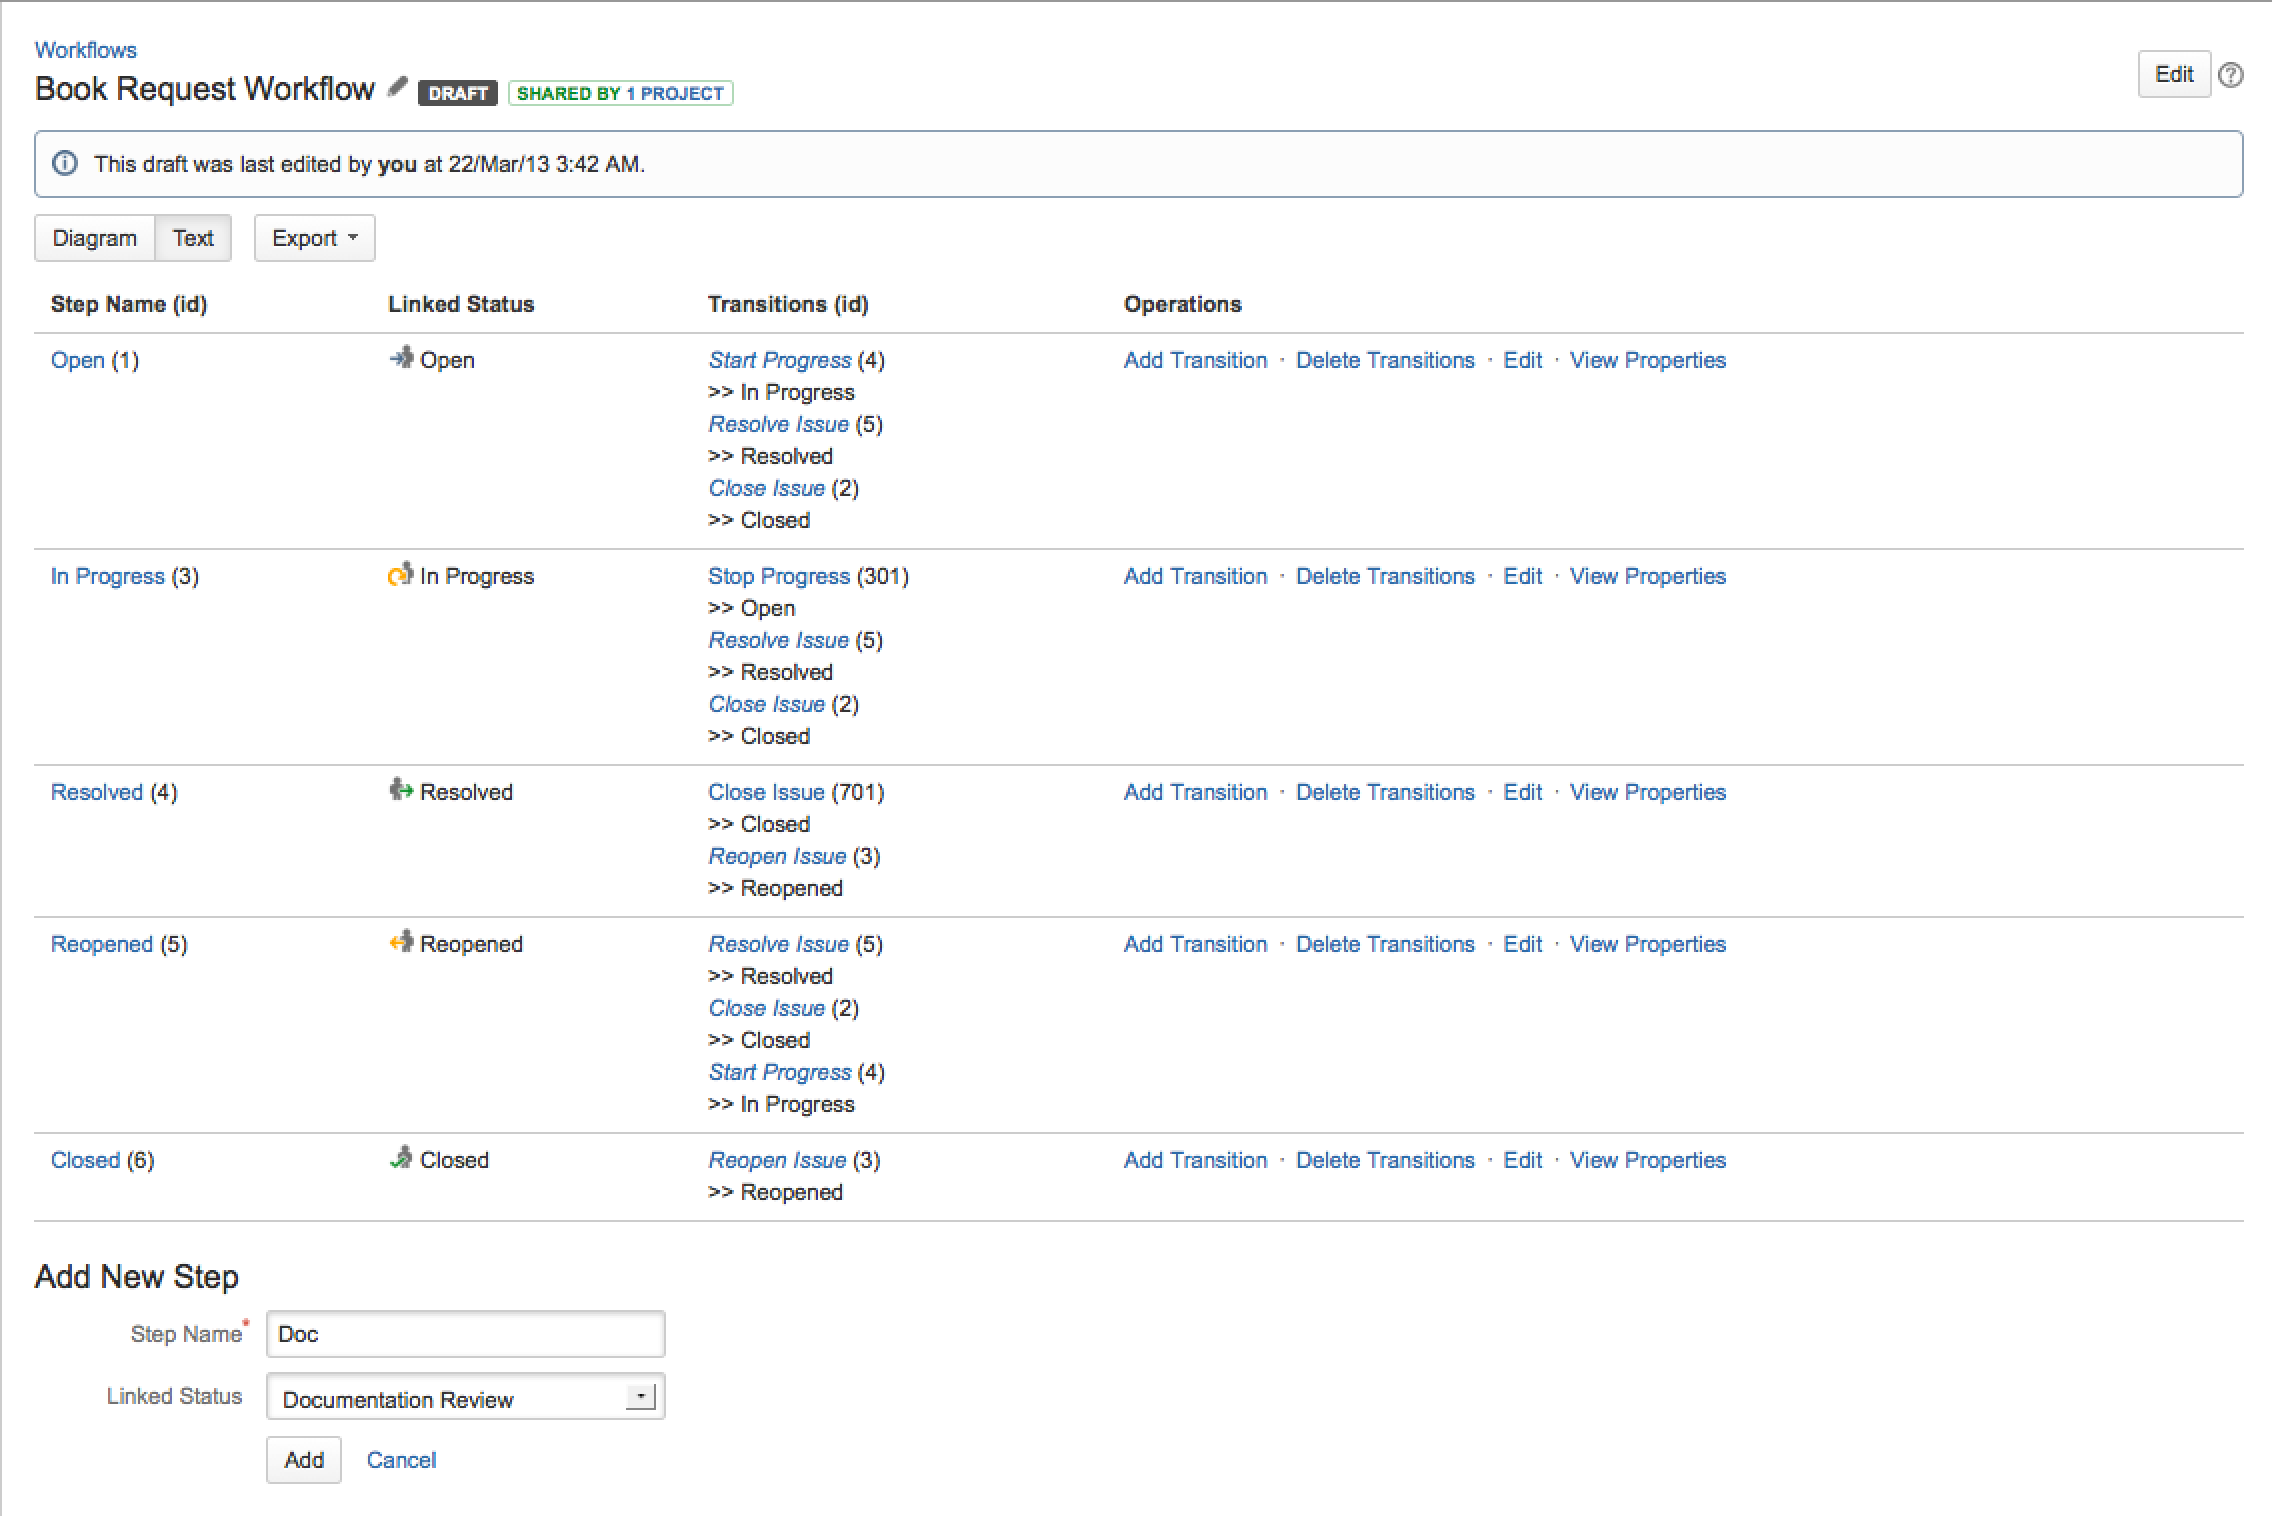
- In the Step Name field, type a short name for the step.
It is helpful to use the name of the corresponding linked status (in the following step). - In the Linked Status field, select the status that corresponds to this step.
Each status can only correspond to one step in each workflow. Hence, if all statuses are linked to steps in this workflow, you may need to define a new status. - Click the Add button. Your new step appears in your workflow's list of steps in Text edit mode.
![]() Some gadgets (such as Assigned To Me and In Progress ) do not display data for issues in and after the Resolved step.
Some gadgets (such as Assigned To Me and In Progress ) do not display data for issues in and after the Resolved step.
Editing a step
To edit an existing step in a workflow:
- Log in as a user with the JIRA Administrators global permission.
- Choose the cog icon at top right of the screen, then choose Issues. Select Workflows to open the 'Workflows' page, which shows a list of all existing workflows in your system.
- Click the Edit link next to the workflow containing the step you wish to edit.
- Make sure the Text button is selected, so that your workflow appears in Text edit mode. A list of existing steps that comprise the workflow and each step's Linked Status and Outgoing Transitions (under Transitions (id)), is shown.
- Click the following link of any step:
- Add Transition — to add an Outgoing Transition to that step. See the Add Workflow Transition page for details.
- Delete Transitions — to delete one or more Outgoing Transitions of that step. This link is only available if the step has at least one outgoing transition.
- Edit — to edit the step's Step Name or Linked Status.
- View Properties — to view and edit the step's Properties. See Using step properties (below) for details.
- Delete Step — to do just that. This link is only available if the step has no Incoming Transitions.
- Alternatively, you can access a step's View Workflow Step page to edit the step.
To access this page, click the name of the step you wish to edit in the Step Name (id) column (e.g. Open). The step's View Workflow Step page is displayed.

- On the View Workflow Step page, the following information is shown about the step:
- On the left of the View Workflow Step page:
- Linked Status — the status (used globally throughout JIRA) to which your specific workflow step is linked.
- In the Workflow Browser section on the right:
- Incoming Transitions — transitions whose Destination Step is the step you are currently viewing. To allow issues to move into this step, there must be at least one incoming transition.
- Outgoing Transitions — transitions whose Originating Step is the step you are currently viewing. To allow issues to move out of this step, there must be at least one outgoing transition.
- On the left of the View Workflow Step page:
- On the View Workflow Step page, you can:
- Click 'Add outgoing transition' to do just that to the step, as shown under Adding a transition below.
- Click 'Delete outgoing transitions' to delete one or more Outgoing Transitions of the step. This option is only available if the step has at least one outgoing transition indicated in the Workflow Browser section.
- Click 'Edit step' to edit the step's Step Name or Linked Status.
- Click 'Delete Step' to do just that. This option is only available if the step has no incoming transitions indicated in the Workflow Browser section. See Deleting a step for details.
- Click 'View step's properties' to view and edit the step's Properties. See Using step properties for details.
- View and edit any of the step's Incoming Transitions or Outgoing Transitions, by clicking the name of a transition in the Workflow Browser section. See Adding a transition, Adding a validator and Adding a post function for details.
- On the View Workflow Step page, the following information is shown about the step:
- Click the following link of any step:
Using step properties
You can use a workflow step's properties to prevent issues from being edited in a particular workflow step. For example, in a copied system workflow, Closed issues cannot be edited, even by users who have the Edit Issue project permission.
![]() Note:
Note:
- Issues that cannot be edited cannot be updated using Bulk edit.
- You can only edit the properties of a workflow's step if that workflow is editable (i.e. if that workflow is either inactive or a draft of an active workflow). See Editing an inactive workflow for more information.
To stop issues from being editable in a particular workflow step or to set any property of a step:
- Log in as a user with the JIRA Administrators global permission.
- Choose the cog icon at top right of the screen, then choose Issues. Select Workflows to open the 'Workflows' page, which shows a list of all existing workflows in your system.
- Click the Edit link next to the workflow whose:
- step you wish to make uneditable or
- step's property you wish to set.
- Use either Diagram or Text edit mode to set the workflow step's property.
Using 'Diagram' edit mode to set the step's property:
- Make sure that your workflow appears in Diagram edit mode. Your workflow's existing steps are shown in the workflow design area (as indicated in Using 'Diagram' edit mode above).
- Move the mouse pointer over the relevant step and click the cog icon that appears to the right of the step to reveal a popup menu.

- From the popup menu, select Issue Editable to remove the tick from that menu item. This action sets the step's
jira.issue.editableproperty and its value tofalse.
Note: - Selecting Issue Editable from the popup menu again (to add the tick) sets the value of the
jira.issue.editableproperty key totrue. Conversely, deleting the step'sjira.issue.editableproperty in Text edit mode (below) adds the tick back to the Issue Editable popup menu. - Selecting Step Properties from the popup menu opens the Edit Properties dialog box, which allows you to specify additional properties (other than the
jira.issue.editableproperty) on a step. On the Edit Properties dialog box, you can:- Add a new property to the step.
- Edit a property's key or value, by simply clicking the property's key or value to begin editing it.
- Delete a property, by clicking the
 icon to the right of the property and its value.
- Selecting Issue Editable from the popup menu again (to add the tick) sets the value of the
Using 'Text' edit mode to set the step's property:
- Ensure the Text button is selected, so that your workflow appears in Text edit mode. A list of existing steps making up the workflow is shown (as indicated in Adding a step above).
- Click the View Properties link that corresponds to the relevant step. The View Workflow Step Properties page is displayed, showing the step's existing properties (if any). The Add New Property form appears below the list of existing properties (if any have already been defined).
The Add New Property form will not appear if the step's workflow is not editable. - In the Property Key field, type:
jira.issue.editable(or any other Property Key you wish to add). - In the Property Value field, type:
false(or any other Property Value you wish to add). - Click the Add button.
![]() Note:
Note:
- It is not possible to edit a step's properties on this page. To change any property's key or value (or both), you must first delete the property you wish to change and add the new updated property.
- It is possible to implement restrictions on steps using step properties. For more information, see Workflow Properties.
Deleting a step
![]() Note: A step can only be deleted if it has no incoming transitions.
Note: A step can only be deleted if it has no incoming transitions.
To delete a step from a workflow:
- Log in as a user with the JIRA Administrators global permission.
- Choose the cog icon at top right of the screen, then choose Issues. Select Workflows to open the 'Workflows' page, which shows a list of all existing workflows in your system.
- Click the Edit link next to the workflow whose step you wish to delete.
- Use either Diagram or Text edit mode to delete the step from the workflow.
Using 'Diagram' edit mode to delete the step
- Make sure that your workflow appears in Diagram edit mode. Your workflow's existing steps are shown in the workflow design area (as indicated in Using 'Diagram' edit mode above).
- Move the mouse pointer over the relevant step and click the cog icon that appears to the right of the step to reveal a popup menu.
- From the popup menu, select Delete Step to remove the step from the workflow.
Please note that any incoming transitions to the step you delete will also be deleted.
Using 'Text' edit mode to delete the step
- Make sure that your workflow appears in Text edit mode. A list of existing steps making up the workflow is shown (as indicated in Adding a step above).
- Click the Delete Step link that corresponds to the relevant step.
This link will only be shown if the step has no incoming transitions nor would it show if it only has incoming Global Transitions (unlike the equivalent Delete Step function in Diagram edit mode (above), which when used on a step with incoming transitions, will also remove these incoming transitions).
Working with transitions
Adding a transition
To add a transition to a workflow:
- Log in as a user with the JIRA Administrators global permission.
- Choose the cog icon at top right of the screen, then choose Issues. Select Workflows to open the 'Workflows' page, which shows a list of all existing workflows in your system.
- Click the Edit link next to the workflow you wish to add a transition to.
- Use either the Diagram or Text edit mode to add the transition to the workflow.
Diagram edit mode provides more options for creating your new transition, such as the ability to use 'common transitions'.
Using 'Diagram' edit mode to add the transition
- Make sure that your workflow appears in Diagram edit mode. Your workflow's existing steps as well as the lines and labels of transitions between these steps are shown in the workflow design area (as indicated in Using 'Diagram' edit mode).
- Click the appropriate Create Transition button in the main toolbar, according to the type of transition line you wish to create.
- In the workflow design area, click the step that will be the Originating Step of the transition.
- Click the step that will be the Destination Step of the transition.
If you selected either the Create Transition — P olygonal Line or B ezier Line buttons, you can click other areas of the workflow design area first (before clicking the Destination Step) to control the appearance of your transition line.
Once you have clicked the Destination Step, the Add Transition dialog box opens.
- Choose between creating a new transition (New Transition), copying an existing transition (Clone Transition) or using a 'common transition' (Use Common Transition).
- If you choose either New Transition or Clone Transition:
- In the Transition Name field, type a short name for the transition.
This name will be shown to users on the relevant transition button, within the 'operations bar' of the 'view issue' page. - (Optional) In the Description field, type a short description of the purpose of the transition.
- If you chose:
- New Transition, then in the Transition View field, select either:
- No view for transition — choose this if you do not need to prompt the user for input before the transition is executed (i.e. the transition will occur instantly when the user clicks the transition).
- The name of a screen that will be shown to users, asking for input before the transition is executed. You can choose one of JIRA's default screens or any other screen you have created. If no existing screen is suitable, you may want to create a new screen.
Many of JIRA's default screens are used in a copied system workflow (above) and named after the transitions they are used in (e.g. Start Progress and Resolve Issue).
- Clone Transition, then in the Transition To Clone field, select the transition you wish to copy.
Copying an existing transition creates a new independent copy of a transition, which does not result in a 'common transition'.
- New Transition, then in the Transition View field, select either:
- In the Transition Name field, type a short name for the transition.
- If you choose Use Common Transition, select an existing transition (currently used in your workflow which also leads to your Destination Step) from the Transition To Reuse dropdown list. See Working with 'common transitions' for details.
Please Note: - Existing transitions in your workflow which do not lead to your Destination Step will not be available from the Transition To Reuse dropdown list.
- You can select either an existing 'common transition' or an ordinary transition (i.e. a transition that has only been used once on the workflow). If you select an ordinary transition, it will be converted to a 'common transition'.
- If you choose either New Transition or Clone Transition:
- Click the OK button to complete the addition of your transition.
Using 'Text' edit mode to add the transition
- Make sure that your workflow appears in Text edit mode. A list of existing steps that make up the workflow and each step's Linked Status and Outgoing Transitions (under Transitions (id)), is shown.
- Identify the step from which your new transition will originate and click the Add Transition link next to the step. The Add Workflow Transition page is displayed.
- In the Transition Name field, type a short name for the transition.
This name will be shown to users on the relevant transition button, within the 'operations bar' of the 'view issue' page. - (Optional) In the Description field, type a short description of the purpose of the transition.
- In the Destination Step field, choose the step to which issues will move when this transition is executed.
- In the Transition View field, select either:
- No view for transition — choose this if you do not need to prompt the user for input before the transition is executed (i.e. the transition will occur instantly when the user clicks the transition).
- The name of a screen that will be shown to users, asking for input before the transition is executed. You can choose one of JIRA's default screens or any other screen you have created. If no existing screen is suitable, you may wish to create a new screen for the transition.
Some of JIRA's default screens are used in JIRA's system workflow (above) and reflect the transitions they are used in (e.g. Resolve Issue Screen).
Editing or deleting a transition
To edit or delete an existing transition of a workflow:
- Log in as a user with the JIRA Administrators global permission.
- Choose the cog icon at top right of the screen, then choose Issues. Select Workflows to open the 'Workflows' page, which shows a list of all existing workflows in your system.
- Click the Edit link next to the workflow whose transition you wish to edit or delete.
- Use either Diagram or Text edit mode to edit or delete the transition of the workflow.
Using 'Diagram' edit mode to edit or delete the transition
- Make sure that your workflow appears in Diagram edit mode. Your workflow's existing steps as well as the lines and labels of transitions between these steps are shown in the workflow design area (as indicated in Using 'Diagram' edit mode).
- Move the mouse pointer over the relevant transition label and click the cog icon that appears to the right of the label to reveal a popup menu.

- From the popup menu, you can:
- Select Edit Transition to edit the Transition Name, Description, Destination Step and Transition View of the transition. See the Add Workflow Transition page for details.
- Select Transition Properties to edit the transition's Properties. See Working with transition properties for details.
Using 'Text' edit mode to edit or delete the transition
- Make sure that your workflow appears in Text edit mode. A list of existing steps that make up the workflow and each step's Linked Status and Outgoing Transitions (under Transitions (id)), is shown (as indicated in Adding a transition).
- In the Transitions (id) column, click the link of the Outgoing Transition of the step you wish to edit. The Transition page is displayed.
On the Transition page, the following information is shown about the transition:- On the left of the Transition page:
- Transition View — the screen (usable globally) that your specific workflow transition uses. If your workflow transition does not require a view (i.e. no screen has been specified), then None - it will happen instantly is shown.
- In the Workflow Browser section:
- On the left of the Transition page:
- On the Transition page, you can:
- Click 'Edit this transition' to edit the Transition Name, Description, Destination Step and Transition View of the transition. See the Add Workflow Transition page (above) for details.
- Click 'Delete this transition' to do just that. This link is only available if the step has at least one outgoing transition indicated in the Workflow Browser section.
- Click 'View properties of this transition' and edit the transition's Properties. See Advanced Workflow Configuration for details.
Using a screen with a transition
When a user clicks a particular transition, a screen can be used to gather input from the user before the transition is executed.
Example: using a screen to set the Resolution field
For a particular step in a workflow, you might need to create a transition that moves the issue to a 'closed' status (see 'open' and 'closed' issues). To do this:
Advanced workflow transitions
For more information on workflow transitions, including built-in JIRA conditions, combining conditions into groups, applying validators and post functions, see Advanced Workflow Configuration.